
Standard Window
The Standard Window is one of the Main Windows available in SmartGit, which focuses on teams who have adopted a uniform approach to development, such as the Feature-Flow development process.
Why Use the Standard Window?
The Standard Window simplifies access to many common Git features, and hides some of the advanced Git capabilities, to assist development teams to create new features, address bugfixes, and generally work in a uniform, disciplined approach, against a single remote repository.
Each tab in the Standard Window focuses on a single repository at a time.
Additional repository tabs can be added by clicking on the + icon, opening the Repository Selection View.
Elements of the Standard Window
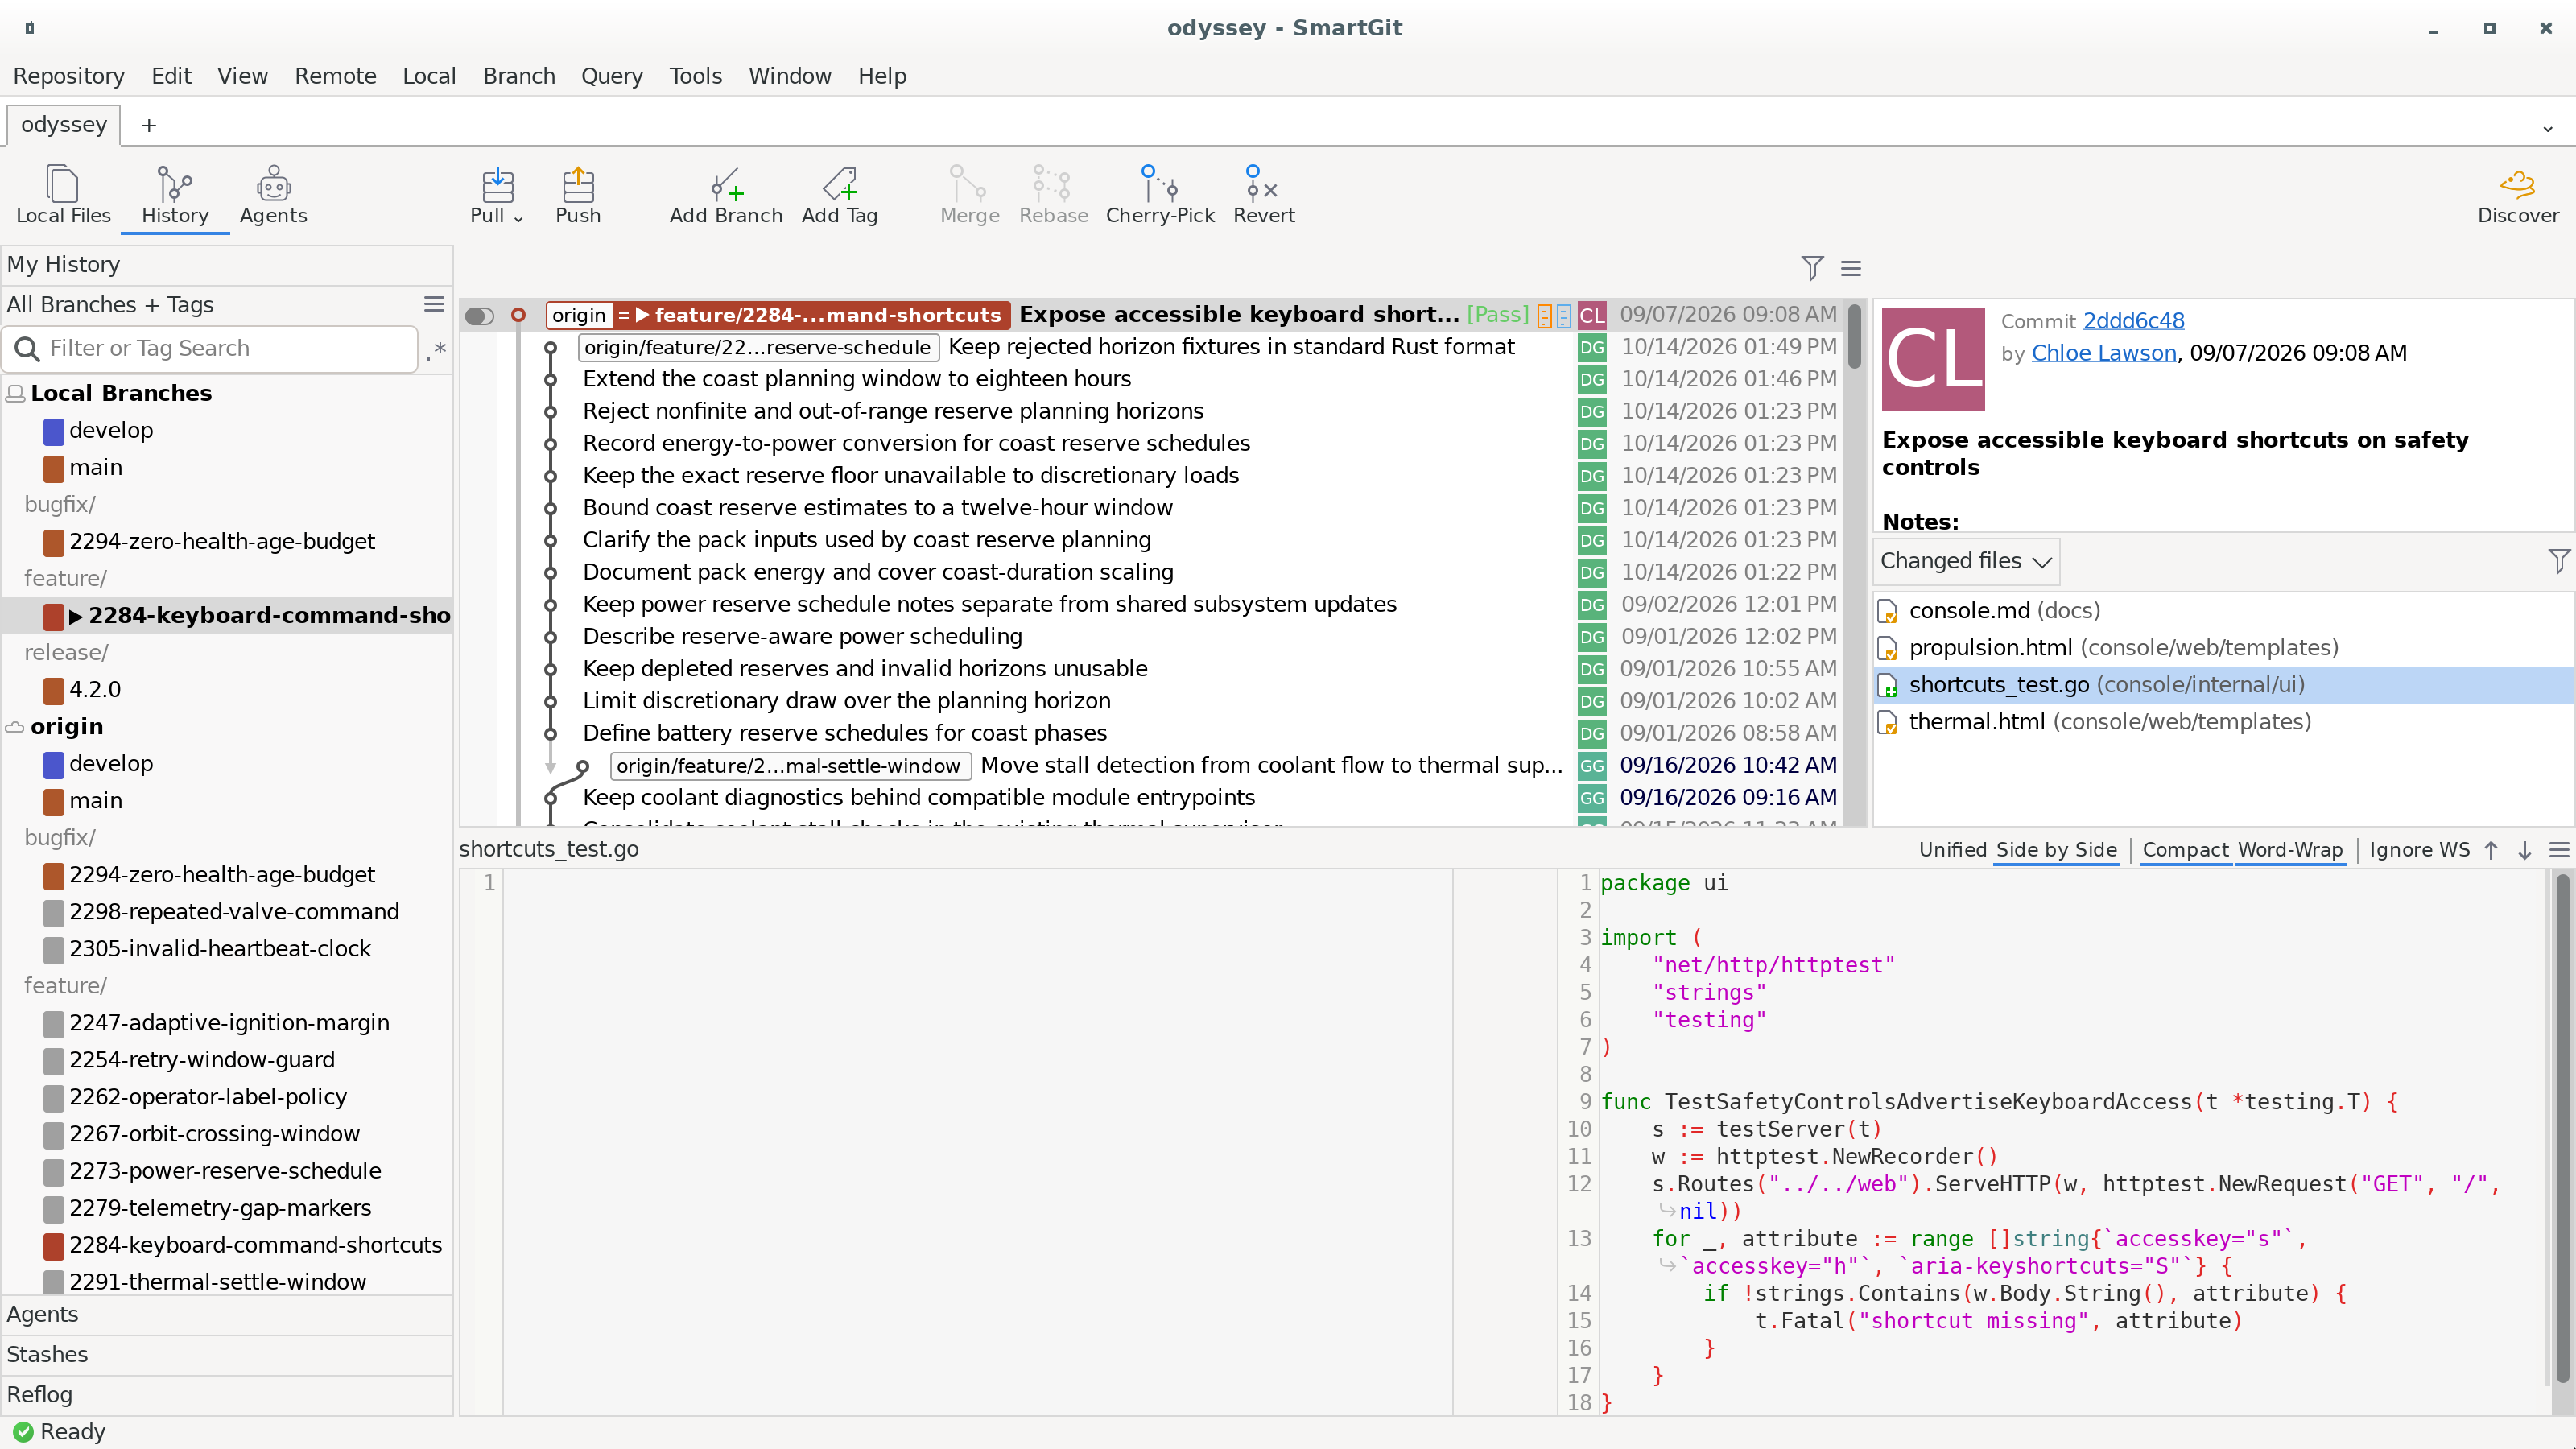
If a top toolbar is too narrow, open the Hidden toolbar items popup at its right end to access commands that no longer fit.
The following layouts are available in the Standard Window:
- A Local Files layout, which focuses on the local Working Tree of the current repository, on a single branch (usually a new feature or bugfix branch):
- The Directories View, showing the folder structure of the current branch in the repository.
- A variant of the Files View, showing the files within the directory selected in the Directories View.
A simplified drop-down filter allows control of the files listed in the view:
- Whether to show All, Changed, and/or Ignored files
- Define the Sort Order of files in the view.
- A Commit View (in working tree mode), allowing new commits to be created from staged Working Tree changes. See below for details.
- A Compare View, showing changes made on the selected file in the Working Tree, or changes between the selected commit(s).
- A History layout, which focuses on the local Working Tree of the current repository:
- An accordion containing the below views. Click on one of the labels in the accordion to select the view:
- The My History View – This view shows all branches in the repository that the user has used recently. Double clicking on a branch will attempt check-out on that branch.
- The All Branches + Tags View – Although similar to the My History View, all branches and tags are shown in the All Branches + Tags View, including remote branches. There is a search widget at the top of the view to allow you to quickly find a particular branch or tag in a large repository. Hover over a remote’s name in this view to see its URL. Hover over an annotated tag to read its tag message. To order numeric parts of ref names from largest to smallest, use Sort By Name (numbers descending) in this view’s menu.
- Stashes View – The Stashes View shows any locally stashed commits, which can be applied to a branch, or discarded, as required.
- Reflog View – Shows the Git Reflog, showing an audit of the changes to
refs/in the current repository. - Agents – A compact conversation pane beside the graph, available after configuring an agent.
- A variant of the Graph View, showing the visual history of the repository, as at the state of the current checked out HEAD. Above this view, there are widgets to:
- Choose the graph scope and compaction options for My History.
- Perform a search (click on the filter icon), for a specific author, committer, commit message, or SHA ID. Additionally, search within file content itself is possible, however this is very resource intensive and is not generally encouraged.
- The hamburger icon allows configuration of:
- the columns displayed in the Graph View
- how the committer is displayed (choose between various Avatar, Name and Email options)
- whether tags are shown in the view or not (in addition to the current branch HEADs).
- The Commit View in commit mode, showing commit audit information about the selected commit, such as the timestamp, author, and commit message. Two commits can be selected in the Graph, which will show the commit metadata for both commits.
- The Files View, showing files changed in the selected commit.
- If a File is selected in the Files View, the difference will appear in the Changes View.
- An accordion containing the below views. Click on one of the labels in the accordion to select the view:
- An Agents layout, available after configuring AI Agents, for reviewing complete conversations and their output.
Click the icon on the left of the status bar to view the latest command’s output.
Focus My History and start typing part of a branch name or pull request number or title to select a matching row. This speed search ignores case.
In My History or All Branches + Tags, select one or more branches or tags and choose Edit | Copy Name. SmartGit copies their short names to the clipboard, sorted by name, with one name per line. Local branches can also be renamed from either view.
In both Local Files and History, the file filter menu above the file list offers Sort by Path and Sort by File Name. The grouping options are:
- No Grouping
- Group by State
- Group by Extension
Within each group, files follow the selected path or file name order. Each layout remembers its own sorting and grouping settings.
Grouping branches in My History
Choose Group Branches in the My History view menu to turn prefix grouping on or off.
Grouping is enabled by default, and SmartGit remembers your choice.
Branches with the same prefix up to the last / appear under one heading when there are at least two of them.
Their rows omit the repeated branch prefix.
Trunk branches remain separate at the top.
Note
The low-level property standard.myHistory.groupingThreshold sets the minimum number of branches per group (default 2).
Set it to 1 to group even a single prefixed branch, or 0 to disable grouping.
Filtering pull requests in My History
With GitHub or GitLab integration active, use the My History view menu to choose which requests to show:
- Show ‘My’ Pull Requests (involving me) (default)
- Show ‘My’ and Unassigned Pull Requests
- Show All Pull Requests
- Don’t Show Pull Requests
GitLab uses Merge Requests in these labels. SmartGit remembers this choice.
Dragging Branches and Tags
Drag local branches in My History, or local branches and tags in All Branches + Tags, onto another ref. Choose a command from the popup menu. The refs must point to different commits.
- Drop another local branch or tag onto the current branch to offer Merge or Rebase HEAD to the dragged ref.
- Drop the current branch onto another branch or tag to offer Rebase HEAD to or Reset HEAD to the target.
- Set moves a dragged, non-current branch or tag to the target commit.
Reset HEAD to uses a hard reset. Pause over a target ref during a drag to reveal its commit in the Graph. This can clear the graph filter and temporarily extend the graph.
Remote branch rows can be drop targets, but cannot be dragged by default. Pull request rows do not support this operation.
Note
If the branch is checked out in another worktree, Set hard-resets that worktree to the target commit. That worktree must be clean and have no pending Git operation.
Features available ONLY in the Standard Window
The following functionality is unique to the Standard Window:
- Support for the Feature-Flow development process
- Support for GitHub Actions, if you have the GitHub integration enabled and configured
- Support for showing Jenkins job results, if you have the Jenkins integration enabled and configured
- Support for showing Team City Build results, if you have the TeamCity integration enabled and configured
- Pull will update all unchanged local branches, so even with forced push there are no diverged branches any more after pulling
Commit View behavior in the Standard Window
In History, select a single commit to see its branch and tag relationships in the Commit View. Click a linked ref to select it in My History or All Branches + Tags. Right-click a linked ref for Select Branch or Copy Branch.
The behavior of the Commit View is different in the Standard Window:
- The option to Push to the configured tracking remote after the commit is completed.
- An abbreviated graph of the most recent commits is shown at the bottom of the view.
- The commit message can be copied from a previous commit by clicking on the commit message of a recent commit node in the graph.
- Clicking on a commit node will switch to the History layout of the Standard View, highlighting the selected commit. This clears any active graph filter so the commit can be selected.
- The option to Push to the configured tracking remote after the commit is completed.
- The hamburger icon at the top right of the Commit View provides additional functionality:
- The commit message from a recent commit history can be selected
- The commit message History can be cleared
- The text in the commit message input can be cleared by selecting Reset to Default
- Depending on whether the Local Files or History layout toggle is selected in the Standard Window, the commit view will switch between adding a commit (when the Local Files layout is selected):
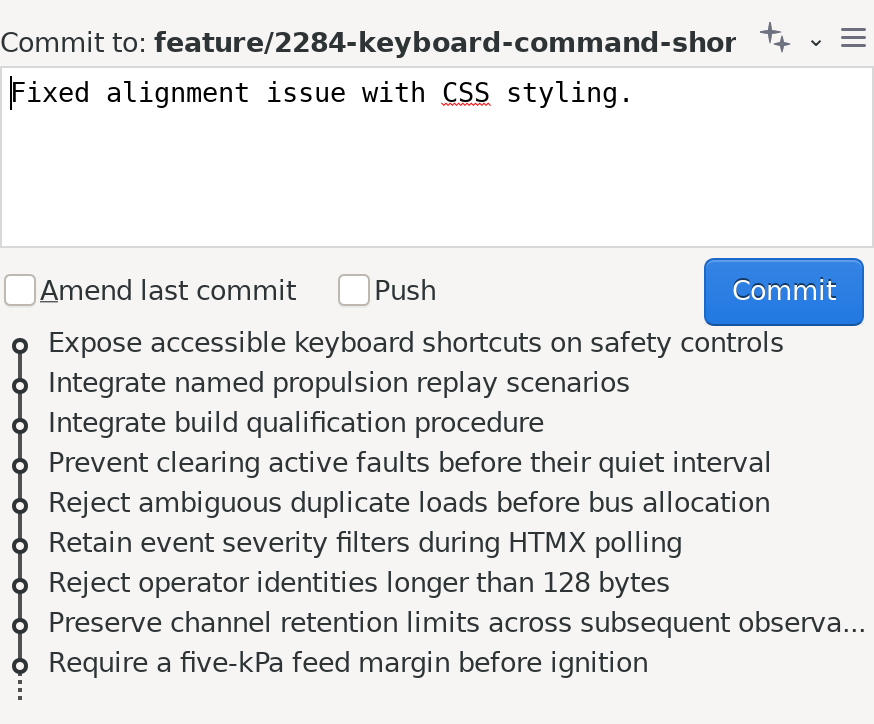
SmartGit Commit View - Adding new Commit
Or viewing a commit (when the History layout is selected):
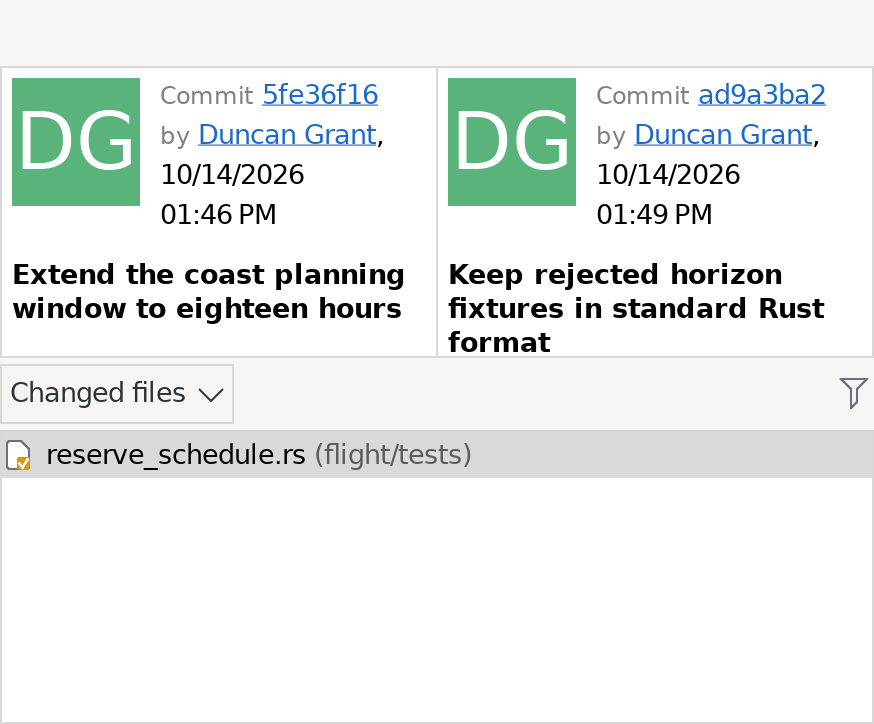
SmartGit Commit View - Viewing existing Commits